Learning how to use an espresso machine properly can transform your daily coffee routine into a café-quality experience. Whether you own a beginner-friendly model or a semi-professional setup, mastering the basics will help you brew rich, aromatic espresso every time.
This espresso machine tutorial walks you through the entire process step by step — from preparation to pulling the perfect shot — so you can get consistent results at home.
What You Need Before You Start
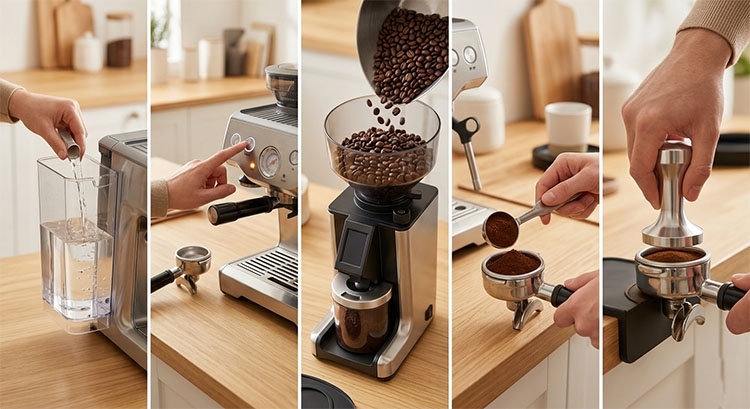
Before diving in, make sure you have the right tools and ingredients:
- Fresh coffee beans (preferably medium to dark roast)
- A quality burr grinder
- Espresso machine
- Tamper
- Filtered water
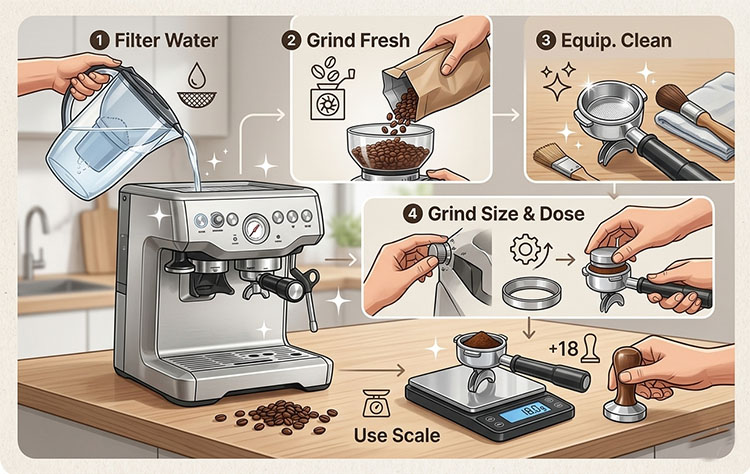
- Scale (optional but recommended)
Tip: Freshly ground coffee is critical. Pre-ground coffee loses aroma and crema quality quickly.
Step 1: Turn On and Preheat the Machine
Espresso machines need time to heat up properly.
- Turn on your machine at least 10–15 minutes before brewing
- Lock the portafilter into the group head while heating
- Run a short water flush to stabilize temperature
A properly heated machine ensures better extraction and flavor.
Step 2: Grind the Coffee Beans
Grinding is one of the most important steps in this espresso machine tutorial.
- Use a fine grind (similar to table salt)
- Dose: typically 18–20 grams for a double shot
- Grind fresh right before brewing
If your grind is too coarse → weak, sour espresso
Too fine → bitter, over-extracted espresso
Step 3: Dose and Tamp the Coffee
Now it’s time to prepare the coffee puck.
- Add ground coffee to the portafilter
- Distribute evenly
- Tamp firmly with consistent pressure
Aim for a flat, even surface
Use about 15–20 kg of pressure
Proper tamping ensures even water flow and extraction.
Step 4: Lock the Portafilter and Start Brewing
- Insert the portafilter into the group head
- Start the extraction immediately
What to watch for:
- Espresso should start flowing after 5–7 seconds
- Ideal extraction time: 25–30 seconds
- Output: about 36–40 ml for a double shot
The stream should look like warm honey
Crema should be thick and golden
Step 5: Evaluate Your Shot
A good espresso shot has:
- Balanced taste (not too sour or bitter)
- Rich aroma
- Thick crema layer
Troubleshooting:
Problem | Cause | Fix |
Sour taste | Under-extraction | Finer grind |
Bitter taste | Over-extraction | Coarser grind |
Fast flow | Too coarse | Adjust grind finer |
Slow/no flow | Too fine | Adjust grind coarser |

Step 6: Steam Milk (Optional)
If you want to make cappuccino or latte:
- Fill a milk pitcher (cold milk works best)
- Purge the steam wand
- Submerge the tip just below the surface
- Create microfoam (smooth, not bubbly)
- Heat milk to 60–65°C (140–150°F)
Tap and swirl milk to remove large bubbles
Step 7: Clean the Machine
Cleaning is essential for taste and longevity.
- Knock out used coffee puck
- Rinse portafilter
- Wipe and purge steam wand
- Run a quick flush
Deep clean your machine regularly (weekly or as recommended).
Pro Tips for Better Espresso
- Use filtered water to avoid scale buildup
- Always grind fresh beans
- Keep your equipment clean
- Experiment with grind size and dose
- Use a scale for consistency
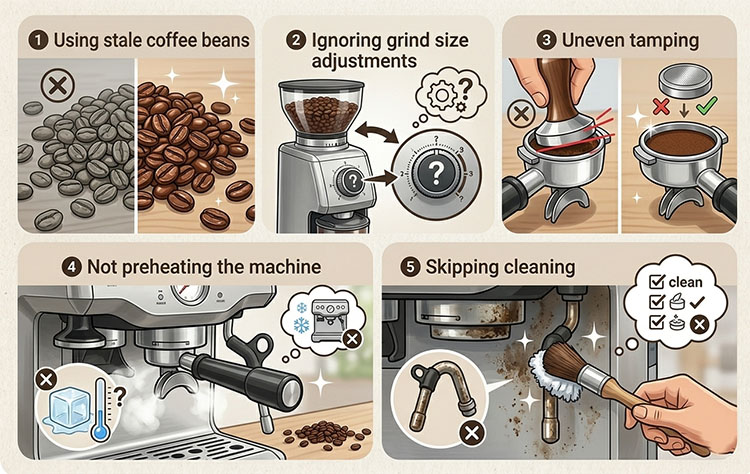
Common Mistakes Beginners Make
- Using stale coffee beans
- Ignoring grind size adjustments
- Uneven tamping
- Not preheating the machine
- Skipping cleaning
Avoiding these mistakes will significantly improve your results.
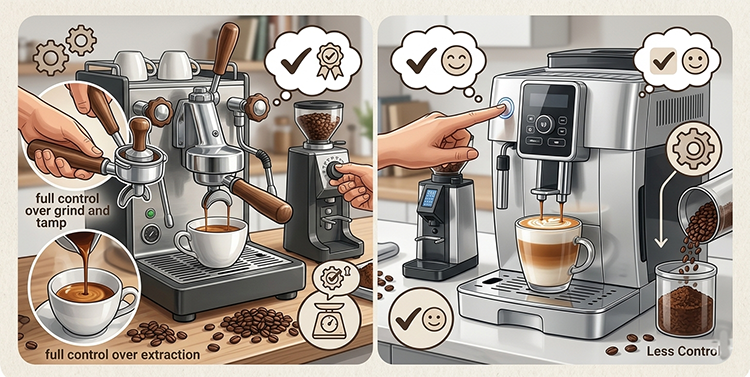
Manual vs Automatic Espresso Machines
Understanding your machine type helps optimize your workflow:
Manual / Semi-Automatic
- Full control over grind, tamp, and extraction
- Better for enthusiasts
Automatic / Super-Automatic
- One-touch brewing
- Easier for beginners
- Less control over variables
Final Thoughts
Mastering how to use an espresso machine takes practice, but the reward is worth it. By following this step-by-step espresso machine tutorial, you’ll quickly learn how to brew café-quality espresso at home.
Start simple, refine your technique, and experiment with different beans and settings. Over time, you’ll develop your own perfect recipe.